Difference between revisions of "SQLink"
| Line 790: | Line 790: | ||
<br>- Check '''Default Export On Invoices''' and click '''Save'''. | <br>- Check '''Default Export On Invoices''' and click '''Save'''. | ||
<br>With this setting, any new invoices created in SME will have the Export to QuickBooks checkbox checked. After the invoice syncs to QuickBooks, the box will be cleared. | <br>With this setting, any new invoices created in SME will have the Export to QuickBooks checkbox checked. After the invoice syncs to QuickBooks, the box will be cleared. | ||
| + | |||
<br>- Click [[Editing a Combined Invoice]] to learn about how edited combined invoices in SME update the invoice in QB. | <br>- Click [[Editing a Combined Invoice]] to learn about how edited combined invoices in SME update the invoice in QB. | ||
<br>- If an invoice is deleted in SME, the invoice is not deleted in QuickBooks. You will need to delete the invoice in QuickBooks also. | <br>- If an invoice is deleted in SME, the invoice is not deleted in QuickBooks. You will need to delete the invoice in QuickBooks also. | ||
| Line 799: | Line 800: | ||
<h3>Invoice Numbers</h3> | <h3>Invoice Numbers</h3> | ||
Click '''[[Invoice Numbers in SME and QuickBooks]]''' to read about your options on invoice numbers in SME & QuickBooks. | Click '''[[Invoice Numbers in SME and QuickBooks]]''' to read about your options on invoice numbers in SME & QuickBooks. | ||
| − | |||
== Purchase Order Sync Details == | == Purchase Order Sync Details == | ||
Revision as of 22:30, 5 November 2012
SME to QuickBooks Link Synchronization Tool Definitions:
1) QB: QuickBooks® by Intuit®
2) SME: Service Management Enterprise by High 5 Software™
3) SQLink: SME to QB synchronization program by High 5 Software™
SQLink for QuickBooks is a robust syncing engine linking SME and QuickBooks information. The sync process encompasses four programs:
- SME – Service Management Enterprise
- SQLink – SME to QuickBooks Import- Export data engine.
- QuickBooks by Intuit – all versions from 2004 to the current year. (Note: We have encountered some issues syncing with unsupported versions of QuickBooks . Review the following link regarding Intuit Sunset policies. [1]
- QBFC – QuickBooks File Connector XML parsing engine. Runs behind the scenes.
The following information covers SME to QuickBooks Sync Points, SQLink Initial Setup, and a module list covering setup, optional settings, and troubleshooting common errors.
Support Versions of QuickBooks
Below are the supported versions of QuickBooks:
- QuickBooks Pro (2005 - 2011)
- QuickBooks Premier (2005 - 2011)
- QuickBooks Enterprise (2005 - 2011)
Intuit may discontinue support for QuickBooks editions older than three years. SME and SQLink can connect to these unsupported versions of QuickBooks, but if there are issues connecting High 5 will not assist with problem resolution. (click here [2] to view the QuickBooks Service Discontinuation Plan)
When upgrading QuickBooks to another supported version listed above, you don't need to do anything with SME and SQLink as long as your QuickBooks company file remains in place on the server/server.
Intuit maintains backward compatibility when upgrading to new versions of QuickBooks. Generally there has not been any issue upgrading. Most of our customers upgrade and then call to see if it’s still compatible. Note: new features added to QB will not be implemented in SQLink until we’ve decided or have a customer request to integrate the updates.
Sync Points for SME and QuickBooks
The following table lists the synchronization points between SME and QuickBooks modules. Refer to the SQLink for QuickBooks wiki pages for detailed syncing information.
| Accounts | Synced for use of assigning accounts for item syncing only. |
| Business Types | Full sync - Customer Types in QuickBooks |
| Class Tracking | Full sync of class tracking on all modules. Class can be assigned to Customer, Order, Item, etc.. |
| Credit Memos | Synced from QuickBooks . (Need to be applied to an invoice. |
| Customer Balances | Calculated from QuickBooks invoices. A payment or credit must be associated with an invoice to be considered for a balance in SME. |
| Customers | Full two-way sync. Customers can be added or modified in either SME or QuickBooks . Billing/Parent customers for Jobs/Sites should only be updated in QuickBooks due to the possibility of issues with existing history for the job/site. |
| Employees | Sync to SME as technicians and users table. Employees are initially setup in QuickBooks due to sensitive information that is only maintained in QuickBooks . |
| Inventory Assemblies | Do not sync. |
| Inventory Groups | SME Packages = QuickBooks Inventory Groups. Inventory Assemblies do not sync. |
| Invoices from SME | Invoices in SME fully transfer to QuickBooks. Invoices from the QB QuickBooks invoice transfer to SME for balance purposes, no detailed items are transferred on QB Invoices. (QuickBooks invoices cannot be edited in SME.) SME invoices should be edited in SME. |
| Items in QB | Full sync of inventory, non-inventory, service, wage, and discount items. See the "Export Options for Inventory Items" section of the Default Export to QuickBooks Settings page for more information syncing inventory items. |
| Items in SME | Option to sync with QuickBooks or not. If not synced with QuickBooks inventory will use a generic default item to transfer accounting information for invoicing and purchase orders. |
| Payments | Can enter payments in QuickBooks for SME invoices. Payments can also be applied in QuickBooks for SME invoices. QuickBooks invoices can only be paid in QuickBooks. |
| PO Bill | Syncs with QuickBooks when items are received. (Partial receipt increments the Bill # in QuickBooks ). Go to the "Export Options for Purchase Orders" section on the Default Export to QuickBooks Settings page for more information. |
| Proposals | Import from QuickBooks and Export from SME. You cannot export a QB proposal back to QB from SME. |
| Purchase Orders | Optional sync with QuickBooks . Multiple syncing options. |
| Subcontractor Bills | Subcontractors used on orders in SME can create a Bill in QuickBooks. Go to the "Export Options for Subcontractors" section on the Default Export to QuickBooks Settings page for more information. |
| Subcontractor PO | Subcontractors used on orders in SME can create a Purchase Order in QuickBooks . |
| Subcontractors | Sync of 1099 vendors as Subcontractors in SME. Vendors that are Subcontractors are initially setup in QuickBooks due to sensitive information that is only maintained in QuickBooks . |
| Tax Codes and Groups | Controlled by QuickBooks. Enter new tax codes in QuickBooks. |
| Terms | Controlled by QuickBooks. Enter new terms in QuickBooks. |
| Vendors | Full sync between SME and QuickBooks. |
| Wage Items | Synced from QuickBooks. |
| Weekly Timesheet | SME labor item records sync with QuickBooks weekly time sheet. Customer name and job number are transferred. Time sheets must be turned on in QuickBooks to use this feature. |
Initial Setup for SQLink
SQLink is an add-on product to SME to synchronize SME and QB databases. For a complete list of the synchronization points review the Sync Points for SQLink page.
SME handles sales, customers, service orders, and inventory while QuickBooks handles the accounting, payroll, and banking integration. SME and QB together make a very powerful combination for managing your service business.
READ OVER THIS DOCUMENT CAREFULLY.
It is very critical that the interface between SME and QuickBooks is established properly for your business. The SQLink Wizard will fill in the necessary values as defaults. It is recommended that these values remain in place unless they conflict with your business operations.
Your initial synchronization must take place on the computer hosting the SME database! Please plan for a time when you can complete the process without interruption from other system demands. If on a networked system install the programs on your server. If you do not have a server, designate a system to host the database, and install the programs on that system.
SME/SQLink, and QuickBooks must already be installed on the computer where you will run SQLink. If either of these programs is NOT installed, you must install the missing programs. SQLink installs with SME in the SME program folder.
Important: QuickBooks must be updated before performing the initial sync! This may mean that you will have to perform the QuickBooks update on all other computers where QuickBooks has been installed.
SME and QuickBooks: Must have company data filled in. If both SME and QuickBooks are installed and the QuickBooks company file has data, please proceed with these instructions.
Suggestion: It is recommended to start with copies, (sandbox copies) of SME and QuickBooks, rather than your live data until you get the synchronization settings established the way you need to match your business processes. Once all settings are correct and information is passing between the applications to your satisfaction you can setup a live sync with a fresh empty SME database.
Advised: To avoid possible data issues it is advised you run the QuickBooks Verify and Backup utility prior to setting up SQLink and SME.
There are two types of initial synchronizations:
- To an SME install with no prior data importing the QuickBooks data. (Referred to as an initial sync.)
- To an SME installation that has been used for running your business and a QuickBooks file that has also been used to run your business without synchronization. (An in place sync.)
If your installation falls under number 2 please contact High5Software prior to performing the initial sync as care must be taken to clean up data that may cause issues when syncing.
Initial sync to a newly installed SME application: SQLink will install with SME in the SME program folder.
- SQLink will locate your open QuickBooks file.
- QuickBooks will open the Access Confirmation dialogue shown below.
- Note: on some versions of QuickBooks this will happen again at a later stage in the setup process.
- You will see the following screen in QuickBooks.
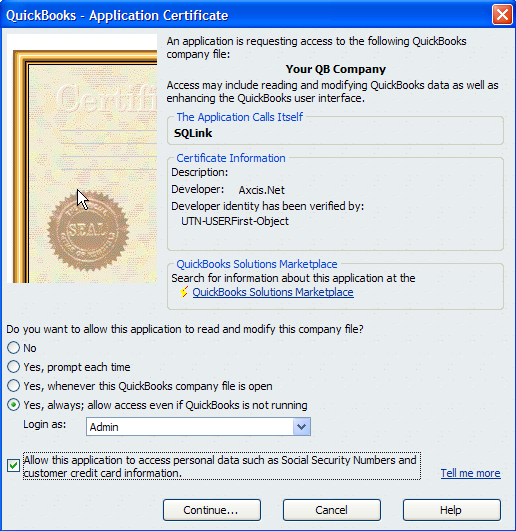
- Click on ‘Yes’, always allow access even if QuickBooks is not running.
- Login as “Admin” (Note: Admin is the level required for SQLink to accesses QB. It is not the level users of SQLink access QB.)
- Check the “Allow this application to access personal data…” This will allow transfer of technician information to QuickBooks.
- Your settings should be as follows:


10. Click “Continue”.
11.You may get a certification warning. Click 'Yes' on this screen.
12.
13.You will see the following QuickBooks screen:

14.Click “Done”.
15.SQLink will now be listed in the Integrated Applications List in QuicBooks.
Set Up For Initial QuickBooks Company
- SQLink will open with the Set up for Initial Company window.
2.
3.The following set up options require attention:
4.Database name (Select Existing) field. Copy the database name from this field.
5.Company Name (Select Existing or Enter New) field. Paste the database name into this field.
6.QuickBooks Company File Location: Click the ellipse in the QuickBooks Company File location and browse to the location of your company file.
7.Note: You can obtain the QuickBooks Company file location by going to QuickBooks and pressing the ‘F2’ key. This will open the Product Information screen. The company file location is in the File Information block:
8.
9.The paths must match exactly!
10.Note: On Vista and Newer operating systems you will be required to close QuickBooks before you can set the path. This is also true of Windows Server 2008.
11.Enter your Area Code
12.Select your Country. (Default is US.)
13.Enter your email address if you want error logs emailed
14.Select your QuickBooks year
15.Click ‘Ok’.
16.Note: On some operating systems you may need to repeat the above steps 2 times before QuickBooks will register the company file path.
SQLink - Initial Setup
Refer to the following steps to set SQLink options and complete the initial sync. Options and settings for the Initial Setup can also be configured after the initial sync. For detailed information on the implications of specific settings refer to the appropriate Wiki page. On Import: On import settings cover SQLink functionality when importing information from QuickBooks for Invoices and Payments, Inactive Customers, Next Invoice Number, and Billing Name Options.

- Merge unmatched invoices and payments: Check this box to match QuickBooks invoices and payments. Leaving it unchecked will not import payment information from QuickBooks. (The usual setting is checked)
- Skip inactive customers on import/export: Checking this box will keep SQLink from importing or exporting inactive customers. Since both SME and QuickBooks are programmed to work with inactive customers it is recommended that you do not check this option. (Usual status is Unchecked)
- Billing Name Options: Default setting is Billing Name = Customer Name. For more info on this topic review the SQLink Customer wiki page at: [[3]]
- On Export: On Export settings cover Tech Time and Purchase Order options.
- Include SMP items on Purchase Order: This option will pass the default SQLink item for that actual item used in QuickBooks if the item does not exist in QuickBooks. (Usual setting is Checked)
- Purchase Order Options.
- Do Not Export Purchase Orders or Bills
- Export Purchase Orders Only – Bills will not export
- Export Purchase Orders & Bills
- Export Bills Only: Since Purchase Orders require further action to tie them to Bills in QuickBooks the Bill is the method of inventory adjustment in QuickBooks. (This is the recommended setting.)
- Make your selections based on the above information and click ‘Next’.
- SQLink will import the following QuickBooks items:
- Pay Methods
- Sales Tax Codes
- Terms
- Classes
- Sales Reps
- Tax Code Groups
- Accounts
- Pay Items
- Discount Items
- Wage Items
- Employee List
- Vendor List
- Inventory List
- Non-Inventory List
- Service List
- Other Charges List
- Inventory Groups
Initial Setup - Invoice Options: Options on this screen determine how invoices export from SME to QuickBooks. These options can be changed after the initial import.

- Invoice Line Items – determines what shows on the invoice for Labor, Material, and Services. These items are ‘default’ items and will be passed on the invoice should an item that is only in SME, and not in QuickBooks, be used on an invoice. (Default settings are to Show Labor, Materials, and Service.)
- Line Item Order: Determines the order of information as it is exported to QuickBooks. (Usual setting is to keep Detail Order.)
- Other Options:
- Show Services Requested. (Usual option is to Not show Services Requested.)
- Show Services Preformed On Invoice. Usual option is To show Services Preformed.)
- Export Purchase Orders for Subcontractors:
- Use Invoice Reference Number:
- Export Bills for Subcontractors
- Use Invoice Reference Number
- Mark Invoice as ‘To Be Printed’ in QuickBooks
- Use ticket number for QuickBooks P.O. Number
- Show Technician Name in Labor Line Item
- Service Location:
- Show at Top
- Show with Charges
- Show at Bottom
- Service Location:
- Make your selections and press ‘Next’
Initial Setup - Payment and Charge Buckets: Options on this screen determine which accounts SQLink will use for the following items. You do not need to select any settings at this time as these will be filled in by the SQLink initial setup wizard.

- Charge Buckets
- Travel Charges Bucket
- Premium Charges Bucket
- Other Charges Bucket
- Freight Charges Bucket
- Excise Charges Bucket
- Late Fees Bucket
- Credit Buckets
- Prepaid Used Bucket
- Discount Bucket
- Credit Bucket
- Refunds Bucket
- Click ‘Next’.
Initial Setup - Classes & Miscellaneous: Options on this screen determine how default classes, time tracking accounts, wage item, and other accounts will pass information. This information will be filled in automatically when the wizard completes the import process.

- Classes
- Labor Class
- Material Class
- Services Class
- Miscellaneous Accounts
- Time Tracking Service Item
- SMP Tax Code
- Wage Items
- Default Pay Wage Item
- Accounts
- Default Payment Receivable Account
- Default Payment Deposit Account
- Default Inventory Asset Account
- Default COGS Account
- Default Service Expense Account
- Default Sales Income Account
- Click ‘Finish’: SQLink will create SQLink default items named SMP_<Item name> in QuickBooks and then complete the importing process.
NOTE: The time required to process an initial import will depend on 2 factors:
1. Number of items in QuickBooks – Customer List, Item List, & Invoice/Payment list. Company files with a lot of information can take hours to process the initial import. Be prepared for this eventuality when starting the syncing process. 2. System resources available to QuickBooks during the sync. If you are running the sync on a system with marginal memory or one that is short on disk space there will be a significant impact on the time required to process the initial sync.
SQLink will complete the following tasks:
- Creating Default Values
- Retrieving Tax Codes
- Creating SMP_tax item
- Retrieving QuickBooks Customers
- Retrieving Invoices and payments
- When the import is complete SQLink will return to the initial Setup tab; Import/Export Options.
SQLink Setup Screens Post Import:
Import/Export Options:

Invoice Options:

Payments and Credits:

Classes and Accounts Options:

The Initial Sync is complete. Close all programs, SME, SQLink, and QuickBooks, and reopen them to process the first regular sync.
Note: This sync can also take a considerable length of time since status flags are initialized on all imported items. QuickBooks is not required to be in ‘Single User’/Admin mode for this sync.
SQLink - QuickBooks Name Length Limitations
The following list outlines QuickBooks field name length limits. In general SME will allow longer names than QuickBooks. If you make a field entry longer than that allowed by QuicBooks SQLink will return an error.
| Customer | ||
| Field | SME | QuickBooks |
| Site Name | 80 | 40 |
| Site Address 1 | 40 | 40 |
| Site Address 2 | 40 | 40 |
| Site City | 20 | 30 |
| Bill Address 1 | 40 | 40 |
| Bill Address 2 | 40 | 40 |
| Bill City | 20 | 30 |
| Mail Name | ||
| Mail Address 1 | 40 | 40 |
| Mail Address 2 | 40 | 40 |
| Mail Address 2 | 20 | 30 |
| Vendor | ||
| Name | 40 | 40 |
| Address 1 | 60 | 40 |
| Address 2 | 40 | 40 |
| Tech | ||
| Tech Name | 40 | 40 |
| Tech Address 1 | 40 | 40 |
| Tech Address 2 | 40 | 40 |
| Inventory | ||
| Name | 40 | 30 |
| Service | ||
| Name | 40 | 30 |
| Tax Code | ||
| Name | 45 | 30 |
| Tax Group | ||
| Name | 45 | 30 |
| Package | ||
| Name | 40 | 30 |
Syncing SME with a new QuickBooks file
A new QuickBooks company file must have the following info before syncing to SME:
Edit> Preferences
* Accounting preferences
* Inventory – Inventory & Purchase orders are active (Even if SME will hold all inventory)
* Payroll & Employees – If transferring SME labor to Time Sheets in QB
* Sales Tax – Yes – Most Common Sales Tax Item will come from SME after the sync
* Time Tracking
Lists> General
* Chart of Accounts
* Sales Tax Code list – Enter Tax & Non Tax
* Item Lists
* Tax Codes and Groups set up in Item Lists
Lists> Customer & Vendor Profile Lists
* Class List
* Terms List
* Payment Method List
* Customer Type list if used
Employees
* Enter with full addresses
* Payroll and Compensation Info
* Enter Wage items – if using time sheets
SQLink Full Sync
SQLink is an add-on product to SME5 to synchronize SME and QB databases. SME handles sales, customers, service orders, and inventory while QuickBooks . handles the accounting, payroll, and banking integration. SME and QB together make a very powerful combination for managing your service business.
This Guide explains the regular sync activity between SME and QB. The sync can be done at any time. Most customers run the sync at the beginning or end of the day, however it can be run whenever needed.
For this guide, the initial sync between SME and QB must be completed. If you have not done the initial sync, Please review the SQLink Install and Setup document.
Synchronization with SME and QB:
1) Synchronizing SME and QB
i. Note: This will perform both an SME export and QB import. Since the SME export is performed first, records that are changed in both SME and QB will only get the SME changes.
ii. Note: QuickBooks . will require you to log in to QuickBooks . on the computer running SQLink. Log into QuickBooks . , SME, and SQLink and then run the sync. The user logging in to QuickBooks must have privileges that allow for the actions to be preformed by SQLink.
SME:
iii. Within SME, Tools> Sync QuickBooks . .
iv. .jpg)
v. Answer ‘Ok’ to the prompt.
vi. Note if you do not have the option “Synchronize with QuickBooks . ”, or the menu option “Sync QuickBooks . ” then the initial import with QuickBooks . has not occurred or has failed. Review the SQLink Install and Setup document or call contact High5 Software technical support at support@high5software.com
SQLink:
vii. Next start processing in SQLink by selecting Processing>Start Processes
ix. .jpg)
x. You will see SQLink starting the sync process.
1. SQLink checks for sync requests about once every few minutes.
2. The Sync is complete when you see the words ‘Payment Processing Complete’
xi. Note:
xii. If you encounter issues at this point it is most likely due to drive mappings that have been changed from the original sync.
xiii. To check:
1. Open SQLink> File> Link Setup
2. Open QuickBooks . > F2
3. The paths for QuickBooks . must match exactly.
SQLink - Module Sync
SQLink supports a manual module synchronization through the Data Functions menu item. You can Import QB data into SME or you can Export specific module items from SME to QB.
QuickBooks data to SME:
- Go to File> Data Functions
* To Import QuickBooks Data:
* .jpg)
1) Import QuickBooks . Data: This will import QB data into SME.
a. Note: if a common record such as Customer is modified in both SME and QB, this function will override the common data in SME with the QB data.
b. This imports all items from QB as mentioned above in the initial synchronization. Only changed items will synchronize so the sync process will be much faster than the initial sync.
Note: The preferred method of sync is listed in the automatic, or SQLink Full Sync Full Sync pages, synchronization because errors can occur. For example if you try to export an Invoice from SME, but a new customer has not been exported yet, SQLink will retun an error from QuickBooks.
1) Export New QuickBooks . Data: This will export from SME to QB.
a. Note: If a common record such as Customer is modified in both SME and QB, this function will override the common data in QB with the SME data.
b. Selections:
i. Export Customers onl
ii. Export Vendors only
iii. Export Techs as Employee
iv. Export Inventory
v. Export Invoices
vi. Export Payments
vii. Export All of the above items
viii. .jpg)
Note: When performing a manual sync you must sync in the order listedon the invocie. For exal=mple; you must eexport a customer before you can export an invocie for that customer.
Customers Module Sync Details
Customer syncing is bi-directional when using SQLink. Customer can be modified in either SME or QuickBooks and those changes will update the other application. As is always the case there will be some instances where the update cannot take place as expected. This will only happen when exporting SME changes to QuickBooks. For more information refer to the Common SQLink Errors page.
Note: If you are syncing SME with a QuickBooks company file that has the same customer list you will need to contact High5 Software to setup a test sync and address all issues prior to going ‘live’ with the sync.
Terms:
Initial Sync: refers to the initial import of QuickBooks lists into SME
Routine Sync: refers to syncing per the users business requirements and can be performed at any time.
Module Sync: refers to using the SQLink Data Functions Module sync to move SME information to QuickBooks.
Site/Job: Sites in SME = Jobs in QuickBooks ‘if’ the location is billing to a different location.
Billing Company: The location to which you are sending the invoice for payment.
Syncing:
Initial sync: The initial sync of SME and QuickBooks will bring all customer records from QuickBooks to SME. You have the option of excluding inactive customers. (It is recommended to bring in inactive customers as SME has provisions for viewing active customers, inactive customers, or all customers.)
Routine Sync: Once a customer is synchronized between SME and QuickBooks, changes can be made in either SME or QuickBooks and the changes will be reflected in the other program. Note: The SME data is exported/synced first, so in the rare case that a record is changed in both SME and QuickBooks, the SME changes will take place and the QuickBooks changes will be overwritten.
Guidelines:
It is a best practice to enter new customers in one application as this will minimize the chance of duplication.
Do not enter company names in SME in excess of 40 characters. (This is a QuickBooks limit). This shows in SQLink as an error on importing.
To change the Billing customer for a Site/Job in SME you must put QuickBooks in ‘Single User Mode’ and then run the synchronization logged in as Admin. (This is a QuickBooks limitation.) The alternative is to move the Site/Job in QuickBooks and then run a routine sync.
Mandatory steps for adding new customers
A best practice is to Always fill out ‘ALL’ information when setting up new records as this will avoid unnecessary errors when syncing invoices.
The following Fields will sync
Customer Name - QuickBooks
Account Number – QuickBooks or SME
Company Name – QuickBooks or SME
First Name, Last Name – QuickBooks or SME
Contact – QuickBooks or SME
Phone, Fax – QuickBooks or SME
Email – QuickBooks or SME
Billing Address – QuickBooks or SME (Note: Refer to Billing Address options below for details on Billing address setup.)
Shipping Address – QuickBooks or SME
Taxes – QuickBooks or SME
Terms – QuickBooks or SME
Sales Person – QuickBooks or SME
Customer Taxes
Review the customer tax setup after creating the customer regardless of the application. If you create the customer in QuickBooks review the tax and set it to the appropriate taxing authority.
Note: (QuickBooks uses a dummy tax as the default when syncing with integrated applications.)
Note: QuickBooks does not provide for setting taxes on Sites/Jobs. The Billing location tax authority is used. SME
Note: After initial creation of the customer SME can NOT change the tax code in QUICKBOOKS. So if the tax code for the customer is changed in SME, it is NOT automatically changed in QUICKBOOKS, and must be manually changed in QUICKBOOKS.
Customer tax setting will override all item level settings. If the customer is tax exempt then the entire invoice will be tax exempt.
SQLink Billing Name Options
- Open SQLink and go to File> Setup
- Click Edit
- You will see the following options for Billing address export:

Billing Name = Customer Name
The Billing name in SME will be matched to the ‘Customer Name’ from QuickBooks.
Billing Name = Company Name
The Billing Name will be matched to the ‘Company Name’ from QuickBooks.
Billing Name = First Line of Billing Address
The Billing Name in SME will be matched to the First Line’ of the Billing Address Block. (This is because QuickBooks does not actually treat this as a company name field. They treat it as list of 5 address fields.)
Use Parent Billing Name for non billable companies.
A non billable company is one that has the ‘Is Billable’ flag unchecked in SME. If this is unchecked the option that is chosen above will be used for the Billing Address.


Customer Phone Number Sync
When entering a new customer in SME, the first and third phone number fields sync to QuickBooks Phone and FAX phone numbers as shown in the image below. Even if you change the phone label in SME, it still will sync the first and third phone number fields.

Vendors Module Sync Details
Vendor syncing is bi-directional when using SQLink with the exception of the 1099 setting. Vendors can be modified in either SME or QuickBooks and those changes will update the other application. As is always the case there will be some instances where the update cannot take place as expected. This will only happen when exporting SME changes to QuickBooks. For more information refer to the Vendor errors & troubleshooting pages.
Note: If you are syncing SME with a QuickBooks company file that has the same vendor list you will need to contact High5 Software to setup a test sync and address all issues prior to going ‘live’ with the sync.
Initial Sync: refers to the initial import of QuickBooks lists into SME
Routine Sync: refers to syncing per the users business requirements and can be performed at any time.
Module Sync: refers to using the SQLink Data Functions Module sync to move SME information to QuickBooks.
Syncing:
Initial sync: The initial sync of SME and QuickBooks will bring all vendor records from QuickBooks to SME.
Routine Sync: Once a vendor is synchronized between SME and QuickBooks, changes can be made in either SME or QuickBooks and the changes will be reflected in the other program with the exception of the 1099 setting.
Note: The SME data is exported/synced first, so in the rare case that a record is changed in both SME and QuickBooks, the SME changes will take place and the QuickBooks changes will be overwritten.
Guidelines:
It is a best practice to enter new vendors in one application as this will minimize the chance of duplication.
Do not enter Vendor names in SME in excess of 40 characters. (This is a QuickBooks limit). This shows in SQLink as an error on importing.
Mandatory steps for adding new Vendors:
A best practice is to Always fill out ‘ALL’ information when setting up new records as this will avoid unnecessary errors when syncing invoices.
The following Fields will sync:
Vendor Name – QuickBooks or SME
Company Name - QuickBooks or SME
Account Number – QuickBooks or SME
Address Information – QuickBooks or SME
First Name, Last Name – QuickBooks or SME
Contact – QuickBooks or SME
Phone, Fax – QuickBooks or SME
Email – QuickBooks or SME
Terms – QuickBooks or SME
Vendor 1099 or Sub Contractor
1099(QB) or Subcontractor(SME) settings are set in QuickBooks and synced to SME. Once the initial setting is synced it is a manual setting in either program should you change the setting.
If you are adding a new subcontractor in SME, before you check "is Sub" in the SME vendor, sync the vendor record to QB first, then you can set "is sub" in SME and setup as eligible for 1099 in QB.
http://support.quickbooks.intuit.com/support/pages/inproducthelp/Core/QB2K8/ContentPackage/Payroll/1099/popup_1099pref_table.html
Employees and Technicians Sync Details
Employees
Employees sync to SME from QuickBooks as users. To turn the User record in SME into a Technician, check the Is Technician field
- All address fields should be completed in QuickBooks since blank fields can cause errors should you edit the employee in SME and the edit attempts to sync back to QuickBooks.
- All employees sync regardless of Active or Inactive status
- Salesperson settings sync with the employee
- Employees can be entered in SME and not reside in QuickBooks unless they will become technicians and you are syncing TechTime. You must then add them as an employee in QuickBooks and sync them back to SME and check Is Technician in their user record. You will need to modify the SME name i.e., name-(SME), or something similar since name conflicts can occur.
- NOTE: You must log in to QuickBooks as the Administrator in Single User Mode to export new employee's from QuickBooks to . This is a QuickBooks requirement. If a sync has been processed, and QuickBooks is not logged in with a user that has employee editing permissions, you will need to do the following:
1) Log in to QB as Admin or a user with employee editing permissions
2) Edit the employee in QB to reset the ‘is modified’ flag (i.e. add a period to the address)
3) Put QB in Single User mode
4) Run a sync
5) Return QB to multi-user mode
Technicians
Technicians must be employees in QuickBooks since they may have timesheet data passed from SME to QuickBooks. Technician information is synced with QuickBooks per the sync fields list below.
In order to transfer technician time from SMP labor items in orders to QuickBooks timesheets, the following configuration must be established:
- In SQLink> File> Setup> Transfer Tech Time set the check box
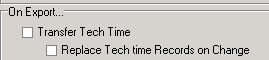
- And if you want labor edits to overwrite previously existing entries for the order check the 'Replace Tech Time Records on Change'.

- The technician must be synced with SME and appear on the Setup> User List in SME with the Is Technician check box checked.

- The employee must be enabled for Payroll Info in QuickBooks as follows:
- Edit the Employee
- Change tabs to “Payroll and Compensation Info”
- Under Earnings, setup an item such as Hourly. If no item exists create one.
- Select “Use time data to create paychecks”
- After sync, the each technician’s labor time from the SME order will show in the weekly Timesheet in QuickBooks.
Field List:
Employees/Technicians - QuickBooks or SME
Name - QuickBooks or SME
Address, City, St, Zip - QuickBooks or SME
Phone - QuickBooks or SME
Email - QuickBooks or SME
Log In Name - QuickBooks or SME
Is Salesperson - QuickBooks or SME
Is Active - QuickBooks or SME
Invoice Sync Details
Invoices that are created in SME will sync to QuickBooks if you have SME to sync invoices by default.

To set the invoices to sync from SME to QuickBooks on the next sync by default:
- Open SME
- Go to Setup module > Company > Order
- Click Edit
- Check Default Export On Invoices and click Save.
With this setting, any new invoices created in SME will have the Export to QuickBooks checkbox checked. After the invoice syncs to QuickBooks, the box will be cleared.
- Click Editing a Combined Invoice to learn about how edited combined invoices in SME update the invoice in QB.
- If an invoice is deleted in SME, the invoice is not deleted in QuickBooks. You will need to delete the invoice in QuickBooks also.
SME Invoice Field Syncing
The chart below shows which SME invoice fields sync to QuickBooks invoice fields.

Invoice Numbers
Click Invoice Numbers in SME and QuickBooks to read about your options on invoice numbers in SME & QuickBooks.
Purchase Order Sync Details
In SQLink on the Import/Export Options tab, you will find the Purchase Order Options section (shown in the image below)

If you are creating Purchase Orders in SME, you need to decide how your SME POs are going to sync with QuickBooks. You have the following options:
- Create PO in SME and SME will send the same PO to QuickBooks on the next sync. You would have to receive stock on both POs.
- Create PO in SME, receive items on the PO in SME, on next sync SME will put a bill in QB for the items received. The bill will increase the stock in QB.
- Create PO in SME and send both the PO and the Bill in QuickBooks.
Click this link for details and video:
http://high5software.com/mediawiki/index.php?title=Default_Export_to_QuickBooks_Settings#Export_Options_for_Purchase_Orders
Initialize PO Bill Date to from Received Item: - If checked, the date on the bill that goes to QB will be the date you received the item, not the PO date.
Initialize by PO Item - Sets the date on the Bill in QB to the line item receipt date from the SME PO
Purchase Order Field Synced
Below is a chart showing which SME PO fields sync to the QB Purchase Order or QB Bill fields.

Tech Time (syncing time sheets to QB)
SME labor item records sync with QuickBooks weekly time sheet. Customer name and job number are transferred. Time sheets must be turned on in QuickBooks to use this feature.
To set up SQLink to transfer tech time, open SQLink. Click File > Setup. Check Transfer Tech Time and Replace Tech time Records on Change (circled in image below)

The image below shows labor items scheduled for a Tech in SME Dispatch and how the tech time transfers to QB Timesheet.


*NOTE* If you do not want labor records created in SME to immediately sync to QB on the next sync, go to SME Setup module > Company > Order and check Don't default Tech Timesheet Export. You will then have to check Export Timesheet to Quickbooks on each labor item when you are ready for it to sync to QB.

* We do not delete time sheet entries in QB. We update existing entries and can reassign entries to another tech.
* If you entered a Labor record for a tech, synced to QB, and later added or removed time the timesheet entry will be updated as opposed to creating a new entry.
* You can reassign a timesheet entry to another tech.
* You cannot delete a labor record in SME and subsequently have the timesheet record deleted in QB.
* If you sync the labor item to QB timesheet and then delete the service order in SME, the tech time is not deleted from QB timesheet.
Auto Process Timer
In SQLink click File>Setup and set the Auto Process Timer to the number of minutes you want to automatically sync.
At the beginning of the day, you will need to open SME, open SQLink, and open QuickBooks. In SME, click Tools > Sync QuickBooks. Keep all three open and throughout the day SME will sync based on the number of minutes you set.
