Difference between revisions of "SME Upgrade 6.3 to 7.0"
Jump to navigation
Jump to search
(Created page with "Instructions for upgrading SME 6.3 to SME 7.0 The Upgrade executable is available from the following download link. Download it and save it to your SME5 program folder. [http:...") |
|||
| Line 11: | Line 11: | ||
** Do Start> Programs> Microsoft SQL Server 2005/2008> Configuration Tools> SQL Configuration Manger | ** Do Start> Programs> Microsoft SQL Server 2005/2008> Configuration Tools> SQL Configuration Manger | ||
** Stop the MSSQL service and the SQL Server FullTextSearch Services. | ** Stop the MSSQL service and the SQL Server FullTextSearch Services. | ||
| − | ** [[File:setup0. | + | ** [[File:setup0.jpg]] |
** Your MS SQL Server instance name may be different. | ** Your MS SQL Server instance name may be different. | ||
** Copy your database folder to a back up location. | ** Copy your database folder to a back up location. | ||
| Line 20: | Line 20: | ||
* Accept the license agreement and click Next | * Accept the license agreement and click Next | ||
| − | *[[File:setup1. | + | *[[File:setup1.jpg]] |
*Browse to the location of your SME/High5Software folder and click ‘Next’. | *Browse to the location of your SME/High5Software folder and click ‘Next’. | ||
| − | *[[File:setup3. | + | *[[File:setup3.jpg]] |
*You should see the following message. If you ‘Do Not’ see this message click the ‘Back’ button and check your path. It ‘Must’ be the same as your SME/High5Software path. | *You should see the following message. If you ‘Do Not’ see this message click the ‘Back’ button and check your path. It ‘Must’ be the same as your SME/High5Software path. | ||
| − | *[[File:setup4. | + | *[[File:setup4.jpg]] |
* Answer ‘Yes’ to the message. | * Answer ‘Yes’ to the message. | ||
| Line 34: | Line 34: | ||
* Click ‘Next’. | * Click ‘Next’. | ||
| − | * [[File:setup5. | + | * [[File:setup5.jpg]] |
* If you are running current Windows operating systems you may see this message: | * If you are running current Windows operating systems you may see this message: | ||
| − | * [[File:setup5a. | + | * [[File:setup5a.jpg]] |
* Answer ‘Yes’. | * Answer ‘Yes’. | ||
| Line 48: | Line 48: | ||
* Review the following installation information. Make sure that the install path is to your SME 5 program folder. | * Review the following installation information. Make sure that the install path is to your SME 5 program folder. | ||
| − | * [[File:setup6. | + | * [[File:setup6.jpg]] |
* Click ‘Install’ if everything is correct. | * Click ‘Install’ if everything is correct. | ||
| − | * [[File:setup7a. | + | * [[File:setup7a.jpg]] |
* The update will install. | * The update will install. | ||
* You will see the following indicating that the installer has completed. | * You will see the following indicating that the installer has completed. | ||
| − | * [[File:setup8. | + | * [[File:setup8.jpg]] |
* Click ‘Finish’. | * Click ‘Finish’. | ||
* SME will launch and will open with the following message | * SME will launch and will open with the following message | ||
| − | * [[File:setup9. | + | * [[File:setup9.jpg]] |
* Click ‘Yes’. | * Click ‘Yes’. | ||
* You will be prompted to back up SME. This is not necessary if you performed the backup procedure of stopping the MS SQL Services, and copying your data files to a backup location, as outlined at the beginning of this document. | * You will be prompted to back up SME. This is not necessary if you performed the backup procedure of stopping the MS SQL Services, and copying your data files to a backup location, as outlined at the beginning of this document. | ||
| − | * [[File:setup10. | + | * [[File:setup10.jpg]] |
* Click ‘No’ if you copied your data as a backup. | * Click ‘No’ if you copied your data as a backup. | ||
* SME will begin to update. | * SME will begin to update. | ||
| − | * [[File:setup10a. | + | * [[File:setup10a.jpg]] |
* When the database re-index completes click ‘Done’. | * When the database re-index completes click ‘Done’. | ||
| − | * [[File:setup10b. | + | * [[File:setup10b.jpg]] |
* The SME will update the tables. | * The SME will update the tables. | ||
| − | * [[File:setup10c. | + | * [[File:setup10c.jpg]] |
* You will be notified that updates are to be preformed to your data. | * You will be notified that updates are to be preformed to your data. | ||
| − | * [[File:setup11. | + | * [[File:setup11.jpg]] |
* Answer ‘Ok’ to the prompt. | * Answer ‘Ok’ to the prompt. | ||
Latest revision as of 14:16, 31 May 2011
Instructions for upgrading SME 6.3 to SME 7.0
The Upgrade executable is available from the following download link. Download it and save it to your SME5 program folder.
http://high5software.com/downloads/sme7/SME_SQLinkUpdater.exe
- Log onto the server or computer hosting the SME database.
- Log all users out of SME 6.3.
- Close SQLink.
- Do Start> Run> fsmgmt.msc to check open files - all SME files must be closed.
- You can skip the stop service steps if you can reboot your server.
- Do Start> Programs> Microsoft SQL Server 2005/2008> Configuration Tools> SQL Configuration Manger
- Stop the MSSQL service and the SQL Server FullTextSearch Services.
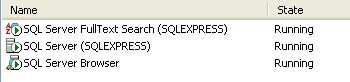
- Your MS SQL Server instance name may be different.
- Copy your database folder to a back up location.
- Restart the ‘SQL Server’ and the ‘SQL Server FullTextSearch’ services.
- Download the ‘SME_SQLinkUpdater.exe’ From the following link.
- http://high5software.com/downloads/sme7/SME_SQLinkUpdater.exe
- Launch the SME_SQLinkUpdater.exe by double clicking or right clicking and selecting ‘Open’.
- Accept the license agreement and click Next


- Browse to the location of your SME/High5Software folder and click ‘Next’.

- You should see the following message. If you ‘Do Not’ see this message click the ‘Back’ button and check your path. It ‘Must’ be the same as your SME/High5Software path.

- Answer ‘Yes’ to the message.
- Uncheck ‘Demo Database’ on the following screen.
- Click ‘Next’.

- If you are running current Windows operating systems you may see this message:

- Answer ‘Yes’.
- Click the check boxes to create the desktop and Quick Launch icons.

- Click ‘Next’.
- Review the following installation information. Make sure that the install path is to your SME 5 program folder.

- Click ‘Install’ if everything is correct.

- The update will install.
- You will see the following indicating that the installer has completed.

- Click ‘Finish’.
- SME will launch and will open with the following message

- Click ‘Yes’.
- You will be prompted to back up SME. This is not necessary if you performed the backup procedure of stopping the MS SQL Services, and copying your data files to a backup location, as outlined at the beginning of this document.

- Click ‘No’ if you copied your data as a backup.
- SME will begin to update.

- When the database re-index completes click ‘Done’.

- The SME will update the tables.

- You will be notified that updates are to be preformed to your data.

- Answer ‘Ok’ to the prompt.
- SME will perform the updates. This can take a considerable length of time with large data files.
- Update will be completed when SME reopens.
- Users can return to SME 7.0.