Difference between revisions of "Return material from customer back to inventory"
Jump to navigation
Jump to search
| (5 intermediate revisions by the same user not shown) | |||
| Line 1: | Line 1: | ||
| − | + | Returns are also called RMA's for Return Material Authorization | |
| − | + | You can generate a return for bringing customer material back into inventory from Customer Equipment or from Returns. | |
| + | |||
| + | == Below are the steps starting from Returns == | ||
# In the Inventory module, select '''Returns'''. | # In the Inventory module, select '''Returns'''. | ||
# Click '''New''' and select '''From Customer'''. | # Click '''New''' and select '''From Customer'''. | ||
| Line 23: | Line 25: | ||
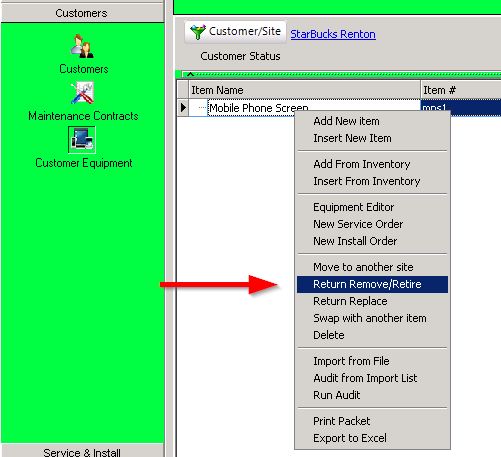
| − | + | == To start a return from customer equipment to inventory:== | |
* Go to Customers > Customer Equipment. | * Go to Customers > Customer Equipment. | ||
* Find your customer and right click on the material you need to return. | * Find your customer and right click on the material you need to return. | ||
| − | * Select '''Retire''' to permanently remove equipment from Customer Equipment and put it back in inventory. | + | * Select '''Return Remove/Retire''' to permanently remove equipment from Customer Equipment and put it back in inventory. |
| + | * [[File:ReturnEquipment.jpg]] | ||
Latest revision as of 17:41, 11 December 2015
Returns are also called RMA's for Return Material Authorization
You can generate a return for bringing customer material back into inventory from Customer Equipment or from Returns.
Below are the steps starting from Returns[edit]
- In the Inventory module, select Returns.
- Click New and select From Customer.
- Select the Customer in the Search window.
- In the return, select the Return Items tab.
- Click New.
- Click Select From Customer Equipment in the “Enter Items to be returned” window.
- Select the material you are returning in the Select Inventory Item window. If it is serialized, write down the serial number because you have to enter it later.
- Make sure the quantity is correct and Click OK.
- Click Save in the return.
- Click Receive Item.

- In the Receive Return Items window:
- If serialized item:
- Check Permanent Removal
- Enter the serial number in the Receive Stock tab and click Add. Click OK.
- If non-serialized item:
- Check Permanent Removal
- Enter the Received Quantity in the Receive Stock tab. Click OK.
- If serialized item:
- You will be prompted with “all items have been received, close return? Click the order?” Click Yes.

To start a return from customer equipment to inventory:[edit]
- Go to Customers > Customer Equipment.
- Find your customer and right click on the material you need to return.
- Select Return Remove/Retire to permanently remove equipment from Customer Equipment and put it back in inventory.