Inventory Quantity Reconciliation
Usually at year end a physical inventory is performed and then reconciled with SME. Any adjustments required should be understood, however SME provides an inventory reconcile tool.
- NOTE* If you are tracking inventory quantities in QuickBooks, any adjustments made to SME inventory using reconciliation will also need to be made in QuickBooks inventory. Only invoices from SME automatically deplete inventory in QuickBooks. Only POs or Bills from SME automatically increase inventory in QuickBooks.
New Inventory Reconcile in SME 8.1 and Beyond
Features and Benefits of New Inventory Reconcile[edit]
- Easier operation for reconciling inventory
- Full tracking of adjustments into "Virtual Physical Count" warehouse.
- This special warehouse shows all your scrapped or adjusted inventory
- This warehouse should NOT be used for inventory reporting
- This warehouse SHOULD be used for reporting of adjustments or scrap of inventory
- Over time your business may adjust parts both positive and negative. This warehouse will get added stock counts when you decrease regular stock warehouse and increase if the parts are found again.
- If parts are found again, inventory reconciliation can be used to move from virtual warehouse back into an actual warehouse.
- You do not have to worry about inventory stock "disappearing" from inventory tracking and reconciliation since all inventory is tracked in and out.
- This warehouse is forced as inactive so that it's not used in standard inventory reports
- Note: If you have a custom inventory report it will need to be updated to NOT count this virtual warehouse.
- Batching
- Batches will allow inventory to be snapshotted for adjustments over multiple days. You can create a batch, make adjustments and then come back later and continue to make adjustments for that batch.
- For example, you may want to run a quarterly inventory reconcile with the following process:
- Get the actual physical count of all or part of your warehouse
- Create a new Batch. This should be done at the same time as your physical count so that it can take a snapshot of SME inventory at the same time as your physical count.
- Make adjustments in inventory reconcile AT ANY TIME. Thus you can adjust a couple parts today, couple more tomorrow and so on until done. You do not need to make all the adjustments in SME since you have the physical and batch snapshot at the same time. Just don't close the batch if you are still making adjustments and just close the batch when all adjustments are made.
- Do additional physical count adjustments on the future days and then close the batch when all your adjustments are complete.
- Batches will allow inventory to be snapshotted for adjustments over multiple days. You can create a batch, make adjustments and then come back later and continue to make adjustments for that batch.
Inventory Reconciliation version 8.1 Operation[edit]
- Select Utilities>Inventory>Inventory Reconciliation and click Run It
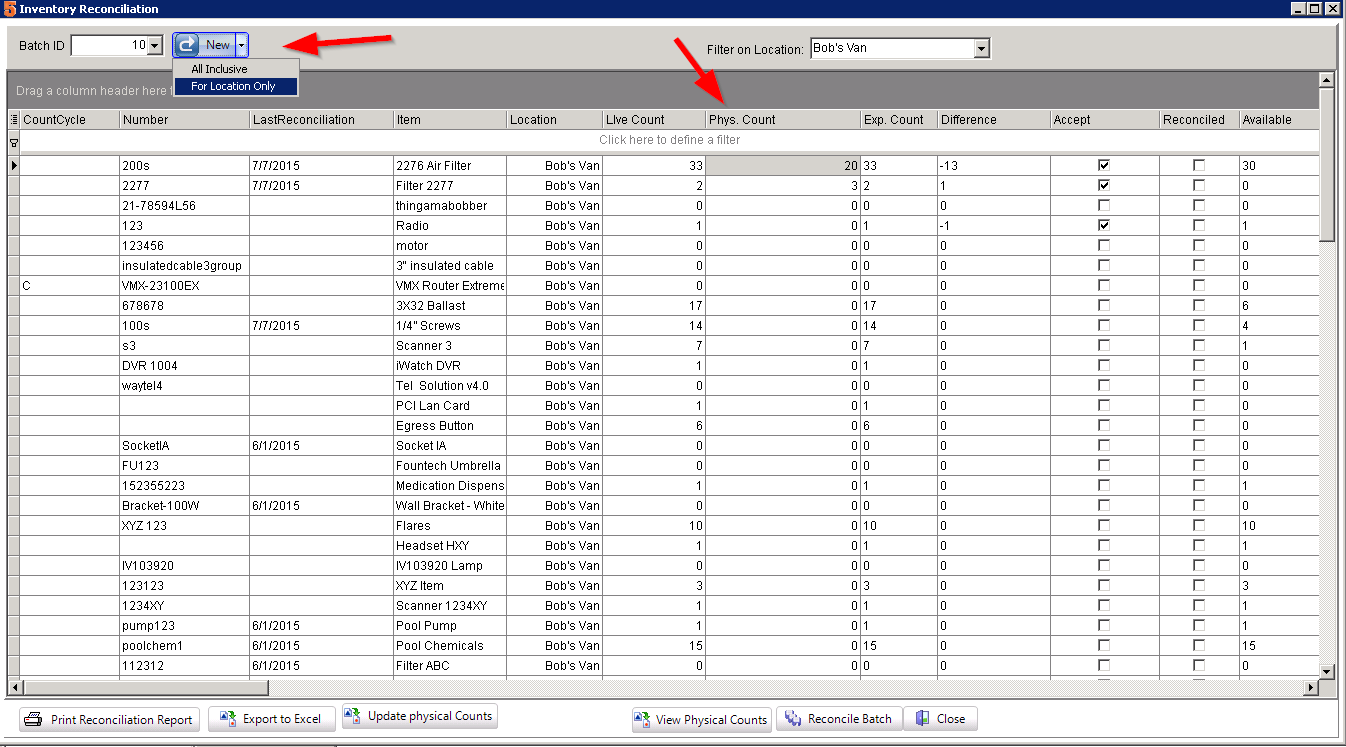
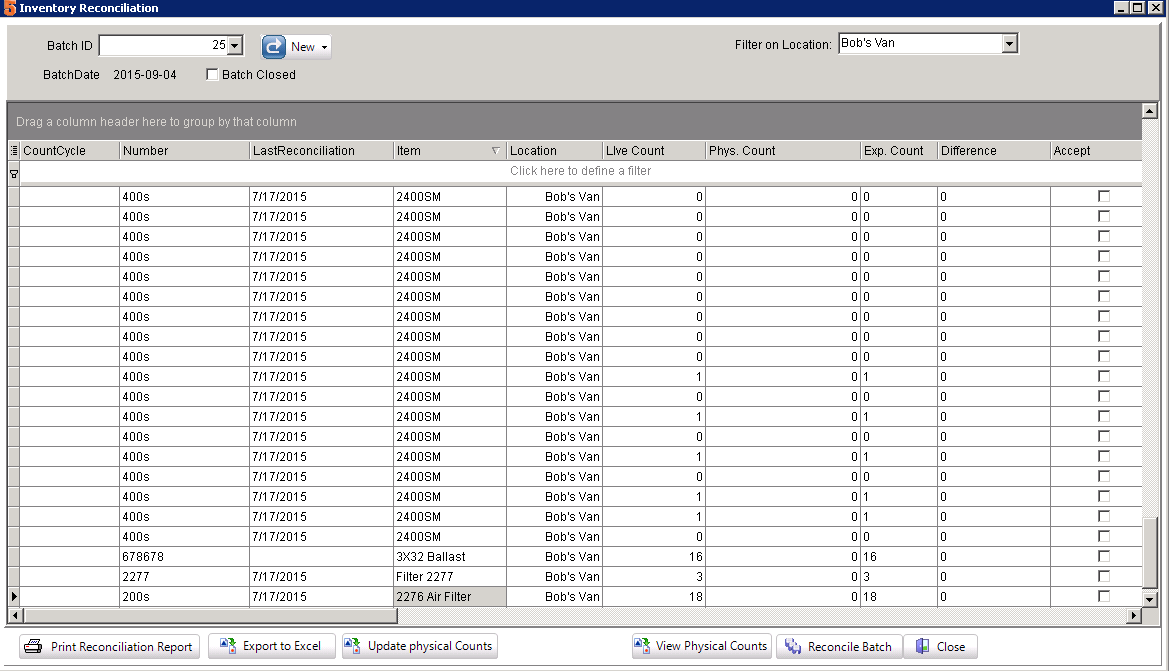
- Column descriptions in Inventory Reconciliation (Note: Your columns may be in different order):
- CountCycle: This is an inventory field for setting the cycle count frequency. This likely will be blank if you are not using this info in SME. In inventory management you would set CountCycle as a number system or just how often the parts should be counted like monthly, quarterly or annually.
- Number: Inventory number
- Last Reconciliation: Last time that part has been reconciled with this tool.
- Item: Item name
- Location: Warehouse location
- Live Count: This is the CURRENT count of inventory for reference only. Because you are able to save a batch which is a snapshot of the inventory in the past, the live count will be SME's current inventory value. This will be helpful to see how much change has been made on that part from the point when you created the batch until now.
- Phys. Count: This is where you enter your adjustment values and should be your current physical count.
- Exp. Count: Expected Count is the amount you are supposed to have in inventory. Any difference filled in for the physical count from the expected count will create an adjustment different.
- Difference: When you enter a value in physical count this will be the difference that will be reconciled. If it's negative, inventory count will be reduced and if it's positive inventory count will be increased.
- Accept: When you run "Reconcile Batch" it will process all items with accept checked. If you are trying to reconcile to zero, you can manually check accept to make adjustment to zero.
- Reconciled: If that part has already been reconciled.
- Available: Stock count at the time when the inventory batch was created.
- Reserved: Number of stock reserved at the time of the batch. Note: SME Inventory Reconcile is not able to reconcile reserved parts since it would not know which order to change from reserved to un-reserved.
- ItemDesc: Description of the item
- Notes: Item notes
- Closed: Batch is closed and no more changes can take place on items marked as closed. Closed items are locked for any more reconcile changes.
- Batch: Select New for a new batch or if you already created a batch you want to continue then select that batch.
- Select New>All Inclusive to adjust all warehouses. Note: If you have lots of data, this is not recommended.
- Select New>For Location Only to adjust one warehouse.
- Filter on Location: Inventory adjustments need to be done per warehouse, so select the warehouse you are adjusting. Note that you will need separate batches for each warehouse.
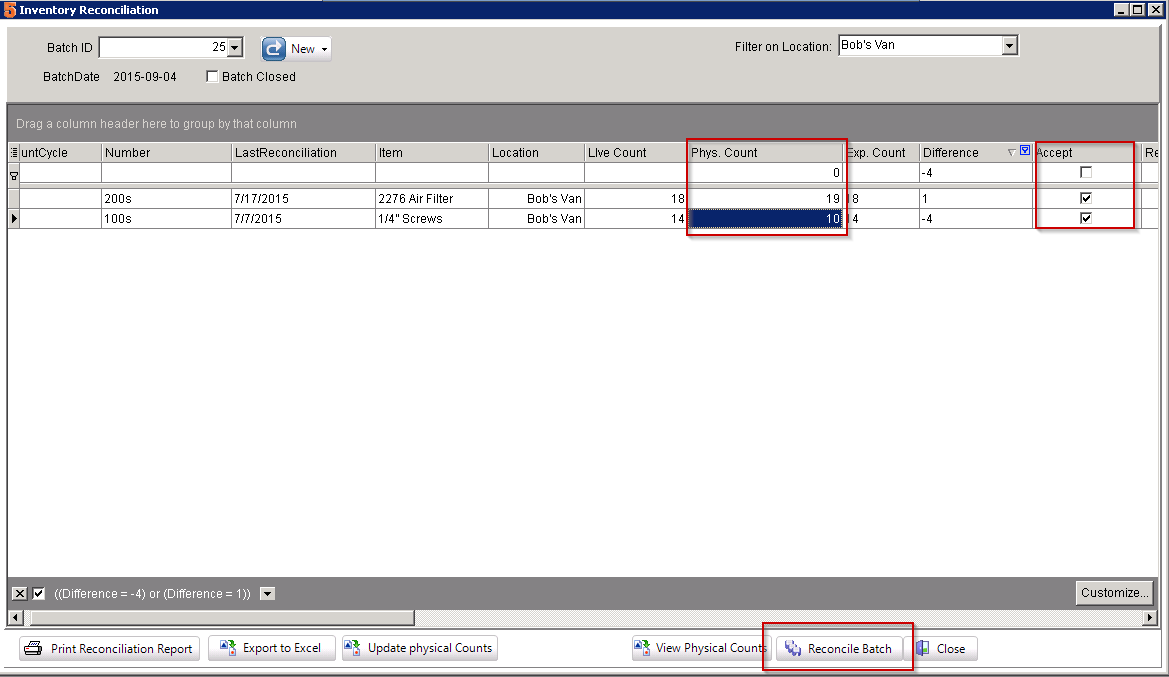
- Make adjustments in the "Phys. Count" column by editing the count value.
- If you want a 0, Zero count then keep the Phys Count as zero and check "Accept" checkbox.
- Serialized parts will show individually since they are each unique. Be sure to adjust the specific serialized parts.
- Once you have all the counts, select Reconcile Batch
- If you are done with your adjustments for this warehouse or period, click Yes to "Close batch when completed". If you plan to make additional adjustments select No.
- Use the top bar for filtering or sorting just like search views
- Print Reconciliation Report will print the changed done during reconciliation.
- Note that the inventory template report must be defined in Setup>Company>Printing>Inventory Template
- Export to Excel to get an excel report of all the adjustments and inventory

Advanced Functionality with Physical Count Data Uploads[edit]
New instructions:
- Export Location table to get the UID's of your warehouse. This is done from the Utilities Module. Select Export Data>Run It. You will want to select Location table. After this move UID and Name to the Destination Fields, and hit start. This will give you your warehouse/location UIDs.
- Export Inventory items mainly the following fields:
- UID (Note: You MUST change this to ItemUID in excel after exported)
- Name (optional, this is exported for reference but not used)
- Number (optional, this is exported for reference but not used)
- Export as a csv file. For this example export as InventoryRecon.csv
- Open InventoryRecon.csv in excel and add do the following:
- Add a column called LocationUID. Copy the Location UID from step one for all items you want to count
- Change column name of UID to ItemUID.
- Add a column called iCount and enter all the physical counts for each item. Note that this should not be negative.
- Import InventoryRecon into the InvenRecon table as follows:
- Go to Utilities>Import>Import Data and select Run It
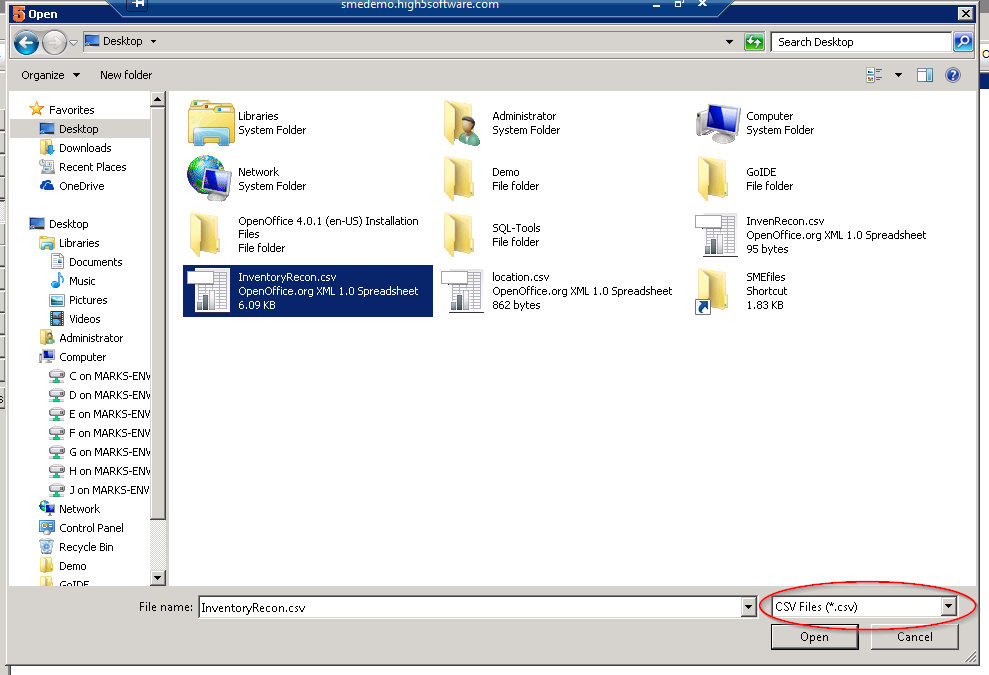
- Select the button next to Source Filename and Load the InventoryRecon.csv files from above. Note in the bottom right corner change teh file type from Excel to csv (or All) to find this file. Select Open
- For Destination Table select InvenRecon and check include UID fields
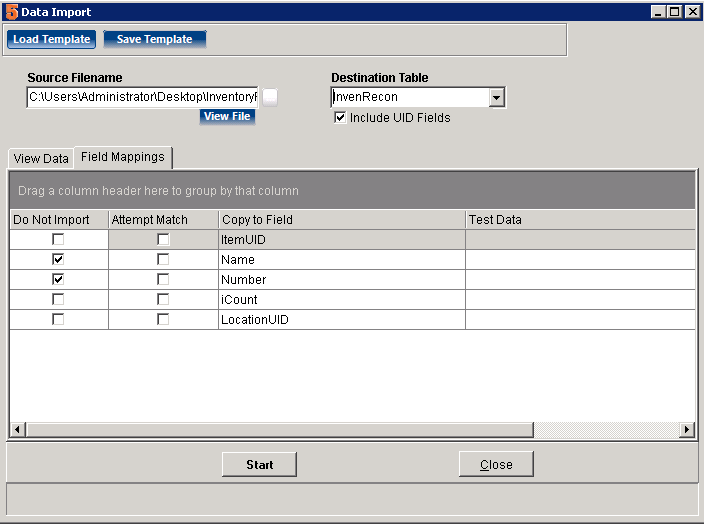
- Set the field mappings as follows:
- ItemUID
- Name and Number should be set not to import
- iCount
- LocationUID is the warehouse location
- HIGHLY recommended to save this template. Select Save Template and give name like InventoryReconcile
- Select Start to import this file
- Now that the inventory reconcile data is loaded it's time to reconcile the warehouse
- Go to Utilities>Inventory>Inventory Reconcile and select Run it
- Select the warehouse you want to reconcile under Filter on Location
- Create a new batch for the warehouse location you want to reconcile by selecting New>For Location Only. Note that this takes a snapshot of inventory and can take a while.
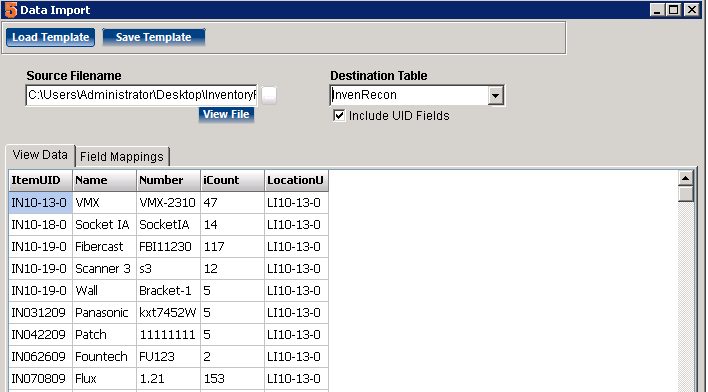
- Optional: To see the data you imported into InvenRecon select View Physical Counts
- Select Update Physical counts. This will take the data from InvenRecon imported above and setup the physical counts. Note that this may take a while with lots of parts.
- Go through and accept for each part that you want to update for the new physical count. Select 'Accept All Counts' to flag all inventory.
- When completed accepting, select Reconcile Batch


Old instructions
- Note: This functionality is requires data to be entered through an external program. At this time, no external program has been created so this functionality is not available without addition work.
- View Physical Counts will load the physical count data table to be used for reconcile.
- Update Physical Counts will update the data table.
- Export to Excel can be used for an excel report or to use for importing a physical count file as described below. Steps to export to excel for a physical count file:
- Create new batch or select existing batch. For new batch you can select for all locations (recommended in your case I think) or a specific location/warehouse.
- Select Export to Excel
- Use this file for manipulation to upload in the next step
- Physical Count Table Structure. Note this is technical since it would most likely be populated by software developer from external system or uploaded from excel.
- Table name: InvenRecon
- Serialized items: Load process for Serialized items is to just load the serial numbers and location. SME logic will find the item information based on matching serial number. So you can just upload a bunch of serial numbers and location that you have in stock
- SerialNumber
- LocationUID: The location of where the serialized part is currently located. If SME reconcile finds this part in another location, it will MOVE it to this location during reconcile.
- Non-serialized items: Import or load the following fields:
- LocationUID: UID of the warehouse/location
- ItemUID: UID of the inventory item
- iCount: Physical inventory count
- Field that should not be imported or loaded:
- BatchID: This should NOT be filled in or imported. SME will look for all records with no batchid to assign to a batch.
- Reconciled: Would usually be false or 0 when data uploaded, then SME will set to true once reconciled.
- Notes: This will be filled in by the reconcile process, so should not be imported or loaded.
Inventory Reconciliation BEFORE SME 8.1
Following Section Applies to before SME 8.1
Adjusting a single inventory item[edit]
If you are adjusting a single inventory item, you can open the Inventory Reconciliation window from the inventory item.
1. Go to the Inventory item in SME.
2. Click Actions > Inventory Reconciliation
3. Inventory Reconciliation window opens for that item only.

4. In Inventory Reconciliation window, you will need to expand the item (first arrow below)
5. Expand the warehouse the stock is in (second arrow below)
6. Type the accurate amount of stock in the warehouse in Physical Count column (circled below) and then hit tab on your keyboard. After you hit tab, the next column shows you the adjusted amount and the Accept column is checked.
7. Click Post Changes at the bottom.

Alternative to manage stock adjustments[edit]
Another option for adjusting stock quantities for inventory items is to setup a separate warehouse in SME to move the excess stock to. This way, if the adjustment was done in error, it is very simply to move the stock back to your working warehouse location. When you do your usual physical count, set the ‘Stock Adjustment’ warehouse counts to zero using the inventory reconciliation utility.
Set up a new warehouse and name it Stock Adjustment or something similar:
1. Go to the Setup Module and click Company
2. Select Lists.
3. Locate Warehouses in the Lookup Lists.
4. Click New in the lower right corner.
5. Enter the new warehouse name such as Stock Adjustment.
6. Click OK
To move stock out of working warehouses into Stock Adjustment warehouse:
1. Locate the inventory item with wrong stock quantities.
2. Select the Material Details tab.
3. Click Move Stock.
4. Enter the quantity to move and select the new warehouse from the Destination drop down.
5. Click OK.

You will now have a detail line showing the stock adjustment. You will need to inform users to not use the stock in the ‘Stock Adjustments’ warehouse.
Adjusting multiple inventory items[edit]
1. Go to Inventory module and select the item you need to adjust.
2. Copy the Item Number.

NOTE – If your Item Names are unique, you can use that and substitute Name for Number for the remainder of the procedure.
3. Go to Utilities > Utilities (1)
4. Select Inventory. (2)
5. Select Inventory Reconciliation (3) and click Run It (4).

The Inventory Reconciliation window will open listing all of your inventory items.
6. Click ![]() in the Number column header and select (Custom..).
in the Number column header and select (Custom..).

7. In the Custom Filter window, enter the Item Number in the field circled in the image below.

8. Click OK.
Notice the inventory list filtered down to the item you need to adjust.
9. Click ![]() on the inventory item row (1 in image below). The editing window will expand.
on the inventory item row (1 in image below). The editing window will expand.
10. Click ![]() to expand the warehouse locations. (2)
to expand the warehouse locations. (2)
11. Enter the accurate inventory count in the Physical Count'Bold text' column (3).
12. Check the box in the Accept column.
13. Click Post Changes (4).

14. Click Yes to message in Information window.
15. When the screen clears, click Close. The quantities will be adjusted.