Vendors
A vendor supplies goods and services to your company. In SME, vendors include both vendors who supply material to your company and subcontractors who supply services to your company.
Vendors are used for purchase orders, RMA returns, and as defaults for inventory items. The vendor module also tracks past Products Purchased and Purchase Orders ordered from the vendor.
Setup a New Vendor[edit]
1. Go to the Inventory module and select Vendors.
2. Click New.
3. Details and Settings tab - enter the vendor name, address and phone details.
4. Enter vendor contacts on the Contacts tab:
- Click New.
- In the Contact Editor, enter the contact Name, Title, Email.
- Enter phone numbers
- Click OK.
View Vendor History[edit]
1. Products Purchased tab – reference all of the parts ordered from the vendor. Sort by item name, order number, date in and more.

2. Purchase Order tab – reference all of the purchase orders placed with this vendor.
3. RMAs tab – reference all the returns to the vendor.
4. Stored Documents tab – link documents to the vendor record or access linked documents.
5. Activities tab – create and reference activities for the vendor.
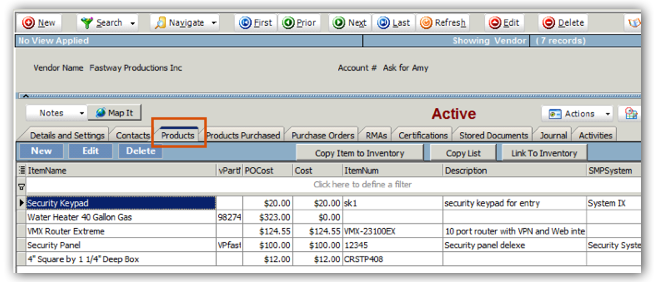
Products Tab[edit]
On the Products tab, you can add the material that you purchase from the vendor. You can specify the vendor part number and the cost of the part from that vendor.
- Click New
- On the Vendor Items window, click
 next to the Item Name field
 - The Search window opens. Select the inventory item.
- Enter the Vendor Part Number if necessary and the PO Cost, which is how much it will cost you to purchase that part from that vendor.
- Click OK.
- Copy Functions:
- Copy Item to Inventory: Creates a NEW inventory item from the SELECTED item only and also creates a new vendor item along with the inventory item. Use this function to copy a single item from the vendor products to inventory items.
- Copy List: Copy entire list of products to another vendor.
- Link to Inventory: Link a product to an existing inventory item. This also creates a vendor item.

You can also add material to a vendor by going to the Inventory Item > Vendors tab.
Setup Subcontractor[edit]
You want to think of a subcontractor as a type of vendor that can be added to service items on service orders and can also be scheduled using the dispatch window. In the vendor record you can set up all the subcontractor settings such as their labor rate, assign them to work groups and determine if you need to schedule them using the dispatch window.
1. Go to the Inventory module and select Vendors.
2. Click New.
3. Details and Settings tab:
- Enter their account information.
- Check Is Subcontractor.
- Check Use as Tech if you schedule the technician and need them on the dispatch window.
![]()
4. Subcontractor Settings tab - enter your subcontractor details
- Labor Rate – this is what the sub charges you per hour
- Work Group – you can add your subcontractor to work groups, similar to the way you would add your own technicians to work groups.
Field of Service tab
On this tab you can enter the subcontractor’s field of service. When assigning subs to order, you can then identify them by their trade or field of service.
Customize the field of service drop down:
Before you can assign a field of service to a subcontractor, you will want to customize the field of service drop down list.
- Go to Setup > Company > Lookup Lists.
- Select Subcontractor Field of Service.
- Click New in the lower right corner.
- Enter the field of service drop down value and click OK.
- Repeat 3 & 4 until your list is complete.
Add field of service to subcontractor
- Go to the subcontractor’s vendor record.
- Select the Field Of Service tab.
- Click New.
- Select the field of service and enter other applicable data.
- Click OK.


Search for Subcontractors with Field of Service
- When you search for workers you can see multiple entires for subcontractors, one for each field of service


WebConnect Password for Subcontractor If you are using WebConnect and you need your subcontractor to log in, assign a login password following these steps:
- Go to the subcontractor's vendor record.
- Select the Contacts tab.
- If there isn't a contact already, click New. If there already is a contact, select the contact you need to give access to and click Edit.
- In the Contact Editor window, enter the contact information.
- Assign a WebConnect password in the Web Access Password field.
- Click OK.
Syncing Vendors with QuickBooks[edit]
If you want vendors created in SME to sync to QuickBooks by default, you need to setup SME to sync vendors by default
- Go to the Setup module > Customer > Order section
- Click Edit
- Check Default Export New Vendor
- Click Save
Now that your default is setup, any new vendors you create in SME will sync to QuickBooks. If you created new vendors in SME before setting the default, you can go to the vendor in SME and check Export to QuickBooks on the Details and Settings tab.
**NOTE**If you created a new vendor with with Is Subcontractor checked, you will first have to uncheck Is Subcontractor, let the vendor record sync to QB, then you can come back into SME and check Is Subcontractor and then setup as eligible for 1099 in QuickBooks.
Syncing Vendor Phone Numbers with QuickBooks
Note: You need to set the Export to QB flag on the vendor in SME to export the phone # updates.
Note: You should set the SME labels to match the QB labels since we have no control over their labels.
To SME from QB The 3 phone numbers transfer to SME into the 3 phone number slots (image below). They transfer in the order entered in QB 1, 2, 3, and the labels in SME do not matter and have no bearing on where a phone # lands. (see image below)

- From QB Phone = slot #1 in SME
- From QB Fax = Slot # 2 in SME
- From QB Alt # = Slot # 3 in SME
To QB from SME Top 2 transfer and 3rd does not.
- From SME = Phone in QB
- From SME #2 = Fax in QB
- Others do not sync
Map (assign) accounts and thresholds to 1099 categories in QuickBooks
http://support.quickbooks.intuit.com/support/pages/inproducthelp/Core/QB2K8/ContentPackage/Payroll/1099/popup_1099pref_table.html